" height="48.00000014038086px" id="xQ5vVHKqO" width="172.73399414062501px"/></svg>)
Workshop
Remote Workshop 101
|
7 minute read


Our team coordinates lean inception workshops and in mid-March, we were supposed to travel and organize one. So as the facilitator, I re-read all the books, made the schedule for 3 days (yes, you can do it in 3), packed the felt pens, post-its, papers, posters, the whole shebang. And then COVID-19 took the world by storm. So we decided to have a remote workshop, with two co-located teams.

A few days later, half of RUBICON’s team was in self-isolation. The day before the workshop, our clients were in #stayhome mode as well. So the final plan was for everyone to check in from home. That meant 11 participants in a 7-hour call for 3 days, each with their own set of special circumstances due to the pandemic. So not quite as planned.
For those of you unfamiliar with the process behind lean inception, it heavily relies on individual and group exercises. They involve writing, walking, presenting - a lot of things that are generally connected with being physically present in a room. So there were quite a few things that could go wrong if you decide to apply the same recipe in a virtual environment. The thing is, our team already knows the recipe is never the same, even in fully co-located workshops. There is always improvisation. So we adapt. We remove some of the activities and add others based on the type of issue we’re facing.
Since most of us around the world are in #stayhome mode during COVID-19 and will be left with no choice but to work remotely, here are some tips for facilitating, regardless of the type of workshop:
Before the Workshop
Adopt a digital-first mindset
This guide to facilitating remote workshops by the MURAL team is excellent, which is why I will not go into a lot of detail - they say it all. Read it and then read it again. It might seem overwhelming, but keep in mind that not everything will be applicable to your workshop. You need to adjust your activities depending on the type of your workshop. For example, for lean inception, you want to abandon all activities that break into small groups. Make them an individual effort instead.
Pay attention to the audio setup
All the participants need to have a quality headset and/or microphone. Keep in mind that if your audio fails, everything fails - we cannot stress this enough.
Choose your means of communication
Some companies have strict rules about the communication tools they use. You need to check with your clients and find one that suits everyone. Pro tip? Try to choose one that offers live captions. Google Hangouts Meet, Skype, and Microsoft Teams all have that option. We tested them on Google Meet and they work like a charm. Even if a participant’s audio comes back scrambled, the captions have a high degree of accuracy. It decreases the amount of times you need to say “I’m sorry, could you repeat that?”
Record the sessions
This has proven to be very useful for us in the past. Sometimes the discussions get very technical and it is difficult to keep track of everything. Later on, you can go back to the recording and check. Most of the communication tools have a built-in option to record the session. If yours doesn’t, you can always use an external app to do it.
Choose a visual collaboration tool
In a co-located meeting, you use a wall, a flipchart and post-its to visualize your progress. Visual output is powerful and there is no replacing it - so how do we do it digitally?
Tool overload is a real issue. We use so many tools on a daily basis that having to learn how to use a new one can be overwhelming, especially for your clients. Our choice? Miro - online whiteboard for visual collaboration. We chose it because it has a short learning curve, a simple UX/UI, and a set of powerful features to help you facilitate. You can integrate it with a lot of the tools you’re already using (Google Drive, Jira, Slack, InVision etc.). And it’s actually fun to use.
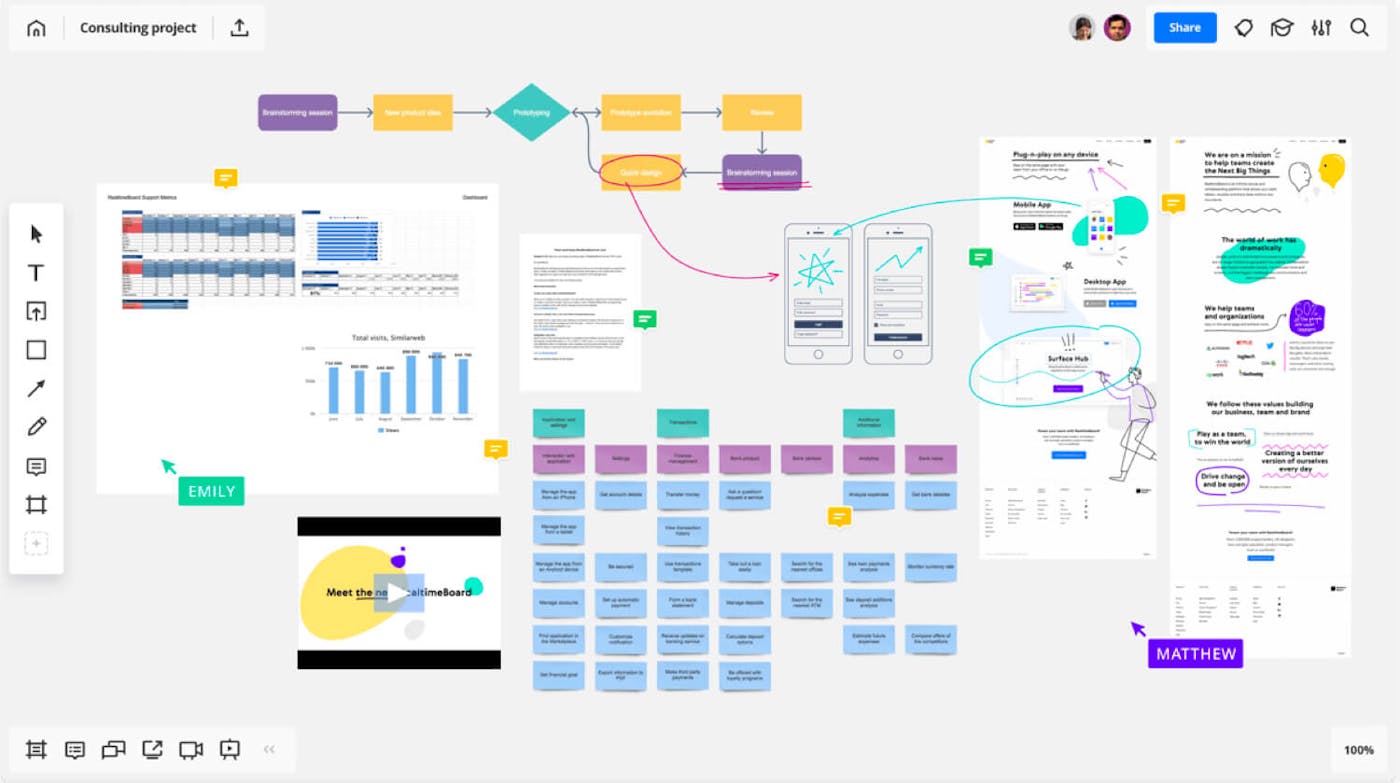
Feel free to check out our Miro board here.
Test, test, test
Before you begin with the workshop, you need to test everything. Set up a call with your team to test how the collaboration will work and see if there are any unknowns. You cannot start your workshop without being aware of how your tools work and interact. Make sure you’ve given access to all tools for all participants.
Explain
Once you have chosen all your tools, you need to walk your participants through the ins and outs. Send them an email a couple of days before the workshop with all the necessary information:
Schedule - incorporate hour lunch breaks as you would in a co-located meeting. Send invites for all the days of the workshop to all participants with links to join the conversation. Additional tip: have two schedules. One with general morning-afternoon time slots for everyone, and a very detailed one just for you. People tend to worry if they see you’re breaking the schedule, but you always have to have space for improvisation and unexpected time management.
Audio directions - tell everyone they need to have quality devices in place. Ask participants if it is OK to record the workshop, as those recordings will be useful later.
Doodling - tell your participants they should have paper and pens with them. Even in digital form, you can always benefit from this. You might not end up using them, but keep them as a backup option.
Tools - explain all the tools you will be using and send necessary tutorials. Tell your participants that you, the facilitator, are responsible for the visual board, but they should familiarize themselves with how it works. It will improve the flow of your workshop.
Reassurance - let everyone know that you will go through the basic communication rules and the workflow first thing when you start your workshop. You cannot explain everything in an email. It is a lot better to set these ground rules at the beginning of the workshop.
Starting the Workshop
Set the rules
Let everyone know that respectful communication is key. There will be interruptions because of a lack of visual cues. You all need to accept that without being annoyed. Body language accounts for a lot in co-located meetings. Work together to bridge that impediment.
Some basic rules are:
If you are not speaking, you should keep your microphone muted to avoid excess noise. This will take a bit of getting used to and a lot of reminders during the first day.
If you need to leave the meeting room, please let everyone know through chat when you leave and when you will be back.
Use the live captions feature (if offered by your communication tool of choice)
Remind the participants that you will be recording the session. Also, don’t forget to click the record button.
Go through the schedule and give a brief explanation of all the activities and what the end result will be.
Get to know each other
I’m not a fan of ice breakers. It’s a subjective attitude, but they all seem to be designed to make people uncomfortable. That being said, it is necessary for everyone to turn on their camera and introduce themselves. It creates a connection between participants and puts a face to a voice. It would be great to keep the cameras on during the workshop, but sometimes it creates technical issues. You can try to turn them on and decide whether to keep them on when you see how it works.
During the Workshop
This is where you start with the first activity. Regardless of the type of workshop you’re running, here are some things to keep in mind during remote facilitating:
Keep track of time as you normally would. You still have a number of activities to go through, so use your timer and make sure everyone knows how much time they have.
As your workshop progresses, do a small recap of the previous day in the morning, just to warm everybody up and get them to focus on the task at hand.
It’s important for all your participants to contribute, but it might be difficult for some of them to share in a remote setting. If you feel that you haven’t heard from someone in a while, call on them giving them some space to be heard.
Keep track of the conversation and if it sounds as if you’re getting off track, feel free to politely interrupt and say “Maybe we can park this discussion for now and get back to it later?” Don’t be embarrassed if you have to do this often - it’s a normal part of the process.
Explain all your activities in detail, possibly with examples of how they should be done. If necessary explain things again and again, until all the participants understand the goal.
...and finally, as COVID-19 is a special circumstance and your participants are probably very worried and under a lot of stress, check in with them. Ask them how they’re doing, and give them space to voice their concerns. Be supportive and understanding if they need to drop out of the conversation because their kids or their pets need them. When they come back, send them a message to explain your progress and where you are now.
Hopefully, this gives you some idea about all the bases you need to cover. The process is demanding, but you can get excellent results as long as everyone is respectful - and as long as your audio works. Cannot stress that enough.
Best of luck!


" height="48.00000014038086px" id="y_gzzqZQT" width="172.73500122070314px"/></svg>)
